A major advantage of using the IAX2 protocol is that it is designed to be more friendly to working within odd network configurations, especially working behind NAT. This makes it a fantastic protocol for softphone clients since they are often utilized on laptops that roam into many different networks, often with no control of the network itself (such as when traveling between hotel networks).
The Inter-Asterisk eXchange (IAX) protocol is usually used for server-to-server communication; more hard phones are available that talk SIP. However, there are several softphones that support the IAX protocol, and work is progressing on several fronts for hard phone support in firmware. The primary difference between the IAX and SIP protocols is the way media (your voice) is passed between endpoints.
With SIP, the RTP (media) traffic is passed using different ports than those used by the signaling methods. For example, Asterisk receives the signaling of SIP on port 5060 and the RTP (media) traffic on ports 10,000 through 20,000 by default. The IAX protocol differs in that both the signaling and media traffic are passed via a single port: 4569. An advantage to this approach is that the IAX protocol tends to be better suited to topologies involving NAT.
There exist many IAX-based softphones, but not so many hardware based phones. The most pronounced reason is because IAX2 is not yet an IETF standard, yet many people have become early adopters and have reaped the benefits.
An excellent IAX2 softphone is idefisk, available at http://www.asteriskguru.com[69] for free download. The authors have had excellent results with this softphone, and since it runs on Microsoft Windows, Mac OS X, and Linux, it is an excellent cross-platform softphone to write about. We will be demonstrating version 1.31 in this book, although version 2.0 was recently released (April 2007) but is not yet available for Linux.
Like the rest of this chapter, we’re attempting to get you up and running quickly with the smallest configuration file set possible in order to minimize the problems you may have in configuring your devices. Just like the sip.conf file, iax.conf requires only a few simple lines to get our IAX phone registered to Asterisk. Let’s take a look:
[general]
autokill=yes

[idefisk]
type=friend
host=dynamic
context=phones
Yes, really, that’s all you need to get your softphone up and running. It’s not the most secure or feature-rich configuration (we’re not even using a password), but this will work.
In the [general] section of our
iax.conf file, we have a single
option: autokill=
yes. We use this option to avoid things from stalling
when a peer does not ACK (reply) to our NEW packet (new call setup
request) within 2000 milliseconds. Instead of the reply to value
yes, you can set this to the number of milliseconds
to wait for the ACK to our NEW packet. You can control the autokill option for each individual peer by
defining qualify for those peers that
you know may be on poor network connections.
The rest of the file contains the definition for our softphone. We
define the type as friend, which tells Asterisk we
will send calls to this device and also accept calls from this device. A
friend is a shortcut for defining a separate
peer (send calls to the softphone), and
user (accept calls from the softphone). We could also
have defined individual definitions for the peer and
user like so:
[idefisk]
type=user
context=phones

[idefisk]
type=peer
host=dynamic
Once you’ve configured your
iax.conf file, save the file and reload the IAX2
channel module from your Asterisk console with module reload
chan_iax2.so. Confirm your new peer exists by running
iax2 show peers.
localhost*CLI> iax2 show peers
Name/Username    Host                 Mask             Port          Status
idefisk          (Unspecified)   (D)  255.255.255.255  0             Unmonitored
1 iax2 peers [0 online, 0 offline, 1 unmonitored]
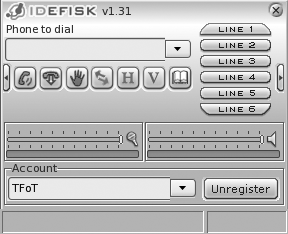
Once you’ve installed the idefisk softphone, open up the client and you’ll see the main screen shown in Figure 4.6, “idefisk”.
[PROD: fileref for Figure 4.6, “idefisk” was out of sequence (pointing to ast2_0405.pdf|png); I changed it to ast2_0406.pdf|png—DCPS]
After we’ve started the softphone, we need to configure our softphone so we can place calls. We also need to register to Asterisk so we can receive calls. To do this, Right-click on the icon in the top-left corner of the screen, which will open a drop-down menu. Select Account Options from the drop-down, which will bring up the screen shown in Figure 4.7, “idefisk Account Options screen”.
[PROD: fileref for Figure 4.7, “idefisk Account Options screen” was out of sequence (pointing to ast2_0406.pdf|png); I changed it to ast2_0407.pdf|png—DCPS]
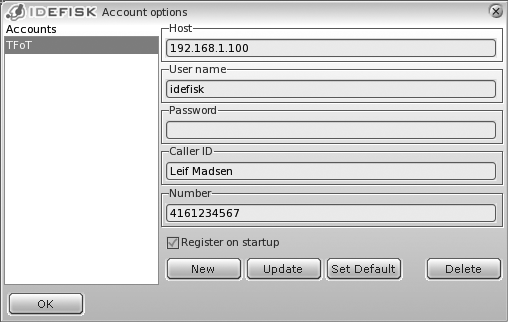
Start by creating a new account on the softphone by clicking the
New button and filling out the relevant information. The Host should
point to the IP address or domain name of your Asterisk system, with the
username matching that of the value located between the square brackets [ ] in
your iax.conf file. Leave the password field blank,
as we did not configure a secret in
iax.conf, and the Caller ID and Number can be set
to whatever you wish. If you want idefisk to register this account on
startup, select the “Register on startup” checkbox. When done, click the
OK button to save the new account.
If you clicked the “Register on startup checkbox,” then the phone will attempt to register to Asterisk. On the Asterisk console you will see output telling you that the phone has registered:
-- Registered IAX2 'idefisk' (UNAUTHENTICATED) at 127.0.0.1:32771
You
can verify your registration with the iax2
show peers command at the Asterisk console:
localhost*CLI> iax2 show peers
Name/Username    Host                 Mask             Port          Status
idefisk          127.0.0.1       (D)  255.255.255.255  32771         Unmonitored
1 iax2 peers [0 online, 0 offline, 1 unmonitored]
One final thing to do is confirm dialing through our phone by configuring a simple dialplan in extensions.conf. You can simply test that you have audio in both directions by calling extension 500, or you can modify the dialplan we created in the the section called “Setting Up the Dialplan for Some Test Calls”” section of this chapter to place some test calls. If you also configured a SIP phone at extension 1000 in the previous sections, then the following will not overlap with that, as we’ll be using extension 1001 (unless you configured multiple SIP extensions, in which case just configure a unique extension number for your IAX2 softphone):
[globals]

[general]

[default]
exten => s,1,Verbose(1|Unrouted call handler)
exten => s,n,Answer()
exten => s,n,Wait(1)
exten => s,n,Playback(tt-weasels)
exten => s,n,Hangup()

[incoming_calls]

[internal]
exten => 500,1,Verbose(1|Echo test application)
exten => 500,n,Echo()
exten => 500,n,Hangup()

exten => 1001,1,Verbose(1|Extension 1000)
exten => 1001,n,Dial(IAX2/idefisk,30)
exten => 1001,n,Hangup()

[phones]
include => phones