The Session Initiation Protocol (SIP),[57] commonly used in VoIP phones (either hard phones, or softphones), takes care of the setup and teardown of calls, along with any changes during a call such as call transfers. The purpose of SIP is to help two endpoints talk to each other (if possible, directly to each other). The SIP protocol is simply a signaling protocol, which means that its purpose is only to get the two endpoints talking to each other, and not to deal with the media of the call (your voice). Rather, your voice is carried using another protocol called the Real-Time Transport Protocol (RTP; RFC 3550) to transfer media directly between the two endpoints.
Note
We use the term media to refer to the data transferred between endpoints and used to reconstruct your voice at the other end. It may also refer to music or prompts from the PBX.
In the world of SIP, we call our endpoints user agents, of which there are two types: client and server. The client is the endpoint that generates the request, and the server processes the request and generates a response. When an endpoint wishes to place a call to another endpoint (such as our softphone calling another softphone), we generate our request and send this to a SIP proxy.[58] A proxy server will take the request, determine where the request is destined for, and forward it on. Once the two user agents have negotiated a successful call setup, the media is transported via the RTP protocol and sent directly between the two user agents. SIP proxies do not handle media; they simply deal with the SIP packets.
Asterisk, on the other hand, is called a Back-To-Back User Agent (B2BUA). This means that Asterisk acts like a user agent in either the server (receiving) or client (sending) role. So when our softphone dials an extension number, the call is set up between the softphone and Asterisk directly. If the logic we’ve built into Asterisk determines that you mean to call another user agent, then Asterisk acts as a user agent client and sets up another connection (known as a channel) to the other phone. The media between the two phones then flows directly through Asterisk.[59] From the viewpoint of the phones, they are talking with Asterisk directly.
Configuring a SIP phone to work with Asterisk does not require much. However, because there are so many options possible in both Asterisk and the configuration of the particular telephone set or softphone, things can get confusing. Add to this the fact that similar things can have different names, and you have a recipe for frustration. What we are going to do, therefore, is give you the bare-bones basics. If you follow our advice, you should be able to get the sets we cover working (and be well on your way to getting a phone that we have not covered to work as well). We are not saying that this is the best way, or even the right way, but it is the simplest way, and from a working foundation, it is much easier to take a basic configuration and tweak things until you get the solution you need.
Note
Just as we did with the extensions.conf file; run the following commands in your bash shell:
            # mv sip.conf sip.conf.sample
# touch sip.conf
If you put the following in a sip.conf file, you will be able to register a phone to the system.
[general]

[1000]
type=friend
context=phones
host=dynamic
Not pretty, not secure, not flexible, not fully-featured, but this will work.
Even though we have named this SIP device
1000, and we are probably going to assign it that
extension number, you should note that we could have named it whatever
we wanted. Names such as mysipset,
john, 0004f201ab0c are all
valid, popular, and may suit your needs better.[60] What we are doing is assigning a unique identifier to a
device, which will form part of the credentials when a call is placed
using the SIP channel.
Since we want to be able to both send calls to the softphone and
allow the client to place calls, we have defined the type as friend. The other two types are user and peer. From the viewpoint of Asterisk, a
user is configured to enter the
dialplan, and a peer is created for
calls leaving the dialplan (via the Dial() application). A friend is simply a shortcut that defines
both a user and a peer. If in doubt, define the type as
friend.
The host option is used to
define where the client exists on the network when Asterisk needs to
send a call to it. This can either be defined statically by defining
something like host=192.168.1.100,
or if the client has a dynamic IP address, then we set host=dynamic. When the host option is set as dynamic, and the client is configured to
register, Asterisk will receive a REGISTER packet from the endpoint
(i.e., telephone set or softphone), telling Asterisk which IP address
the SIP peer is using.
If you do not trust your network, you should probably also force the use of a password by adding the following to the device definition. This is one of those things that is not technically necessary, but is probably a good idea:
secret=guessthis
In the configuration menus of the phone itself (which could be via
a web GUI, through menus on the phone itself, or possibly using
configuration files that are stored on a server), the unique identifier
(which in this case is 1000) again forms part of the
credentials for the authentication process. Naturally, for a connection
to be successful, this has to match in both Asterisk and in the set
itself. The fun begins when you realize that there is no set rule as to
what this identifier is formally called. We have elected simply to call
it the Unique Identifier.
Note
In the SIP RFC (http://www.faqs.org/rfcs/rfc3261.html),
section 19.1 calls this user token, “the identifier of a particular
resource at the host being addressed,” verbiage consistent with our
usage of [1000] as the set
identifier in the sip.conf file
of Asterisk.
Instead, you will want to look for fields that are labeled
user name, auth name, authentication name, and so on.
The thing to remember is that since you know that the Asterisk end of
the equation is configured simply and correctly, you can experiment with
the phone setting until you find a combination that works. This is much
better than the usual suffering that new users go through, as they
change settings in both places and have no luck getting a phone to
register.
Note
We’re gonna say it again: configure sip.conf in the simplest manner possible, and then don’t change your Asterisk configuration. Trust us; what we have written here will work. Get your set working (i.e., where you can make and receive calls), and you will be in a far better position to begin experimenting with different settings. We have seen too much suffering (including our own), and we want it to end.
Note
If you are running Asterisk and a softphone on the same system (i.e., running an X-Lite softphone and Asterisk on a laptop or desktop), then you will need to modify the SIP port that client listens on. It will need to be changed from 5060 to 5061 (or some other unused port) so that Asterisk and the softphone do not interfere with each other.
Before we get into how to define these files, there are a few things that need to be configured on your server. Running the right services on your network will ensure your Polycom sets can autoconfigure from the moment you plug them in. There’s a little work involved here, but we promise that the payoff is worth it. Once you’ve done this a few times, it only really takes a few minutes on each new system, and going forward, it’ll save you a lot of mucking about with web interfaces. When you take your new Polycom phone out of the box, plug it into your network, watch it autoconfigure itself, and then successfully register with your Asterisk machine, you will know the sort of joy that only geeks can experience.[61]
It’s not really that complicated. Where we think people get confused is in making sense of the various ways this can be achieved, because there are a lot of choices.
Typically, a DHCP server is used to configure basic IP parameters for a device (IP address, default gateway, and DNS), but the DHCP protocol can actually pass many other parameters. In our case, we want it to pass some information to the sets that will tell them where to download their config files from. Here is a sample config from a Linux DHCP server that will do what is required:
ddns-update-style interim;
ignore client-updates;

subnet 192.168.1.0 netmask 255.255.255.0 {
 option routers 192.168.1.1;
 option subnet-mask 255.255.255.0;
 option domain-name-servers 192.168.1.1;
 option ntp-servers pool.ntp.org;
 option time-offset -18000;

range dynamic-bootp 192.168.1.128 192.168.1.254;
default-lease-time 21600;
max-lease-time 43200;
}
Keep in mind that this assumes that the only things on this network are devices that belong to the phone system (this setup will hand out an IP address to any device that requests it). If you have a more complex environment, you will need to configure the DHCP daemon to handle the various devices it is serving. For example, you might want to devise a scope that restricts IP addresses in your voice LAN to Polycom phones. Since all Polycom IP desk phones have 00:04:f2 as their OUI (Organizationally Unique Identifier), you might choose to restrict scope based on that.
Note
In a Microsoft DHCP environment, the tftp-server-name is referred to as Boot server host name. It is defined under option 66.
The DHCP protocol is far more flexible than is often realized, because in most environments it is not used for complex provisioning tasks. With a little care and attention, you can devise a DHCP environment that serves both your voice and data devices and greatly simplifies administrative workload when adding new devices.
FTP is currently our favorite[62]way to configure Polycom sets. We would recommend it over TFTP for any set that allows for both. To install it on your CentOS system, the following command will install VSFTPD, the Very Secure FTP Daemon:
# yum -y install vsftpdThen,
in order to lock things down, we need to prevent anonymous logins with
a simple change to the vsftpd config file,
/etc/vsftpd/vsftpd.conf:
# anonymous_enable=NO
Restart the server with service vsftpd
restart. To ensure that the daemon runs after every reboot,
run chkconfig vsftpd on.
Now, we have to create a user account and group for the sets to use. In this case, we will create an account for the Polycom sets:
# groupadd PlcmSpIp
# useradd PlcmSpIp -g PlcmSpIp -p PlcmSpIp
# passwd PlcmSpIp
Set the password to PlcmSpIp (the default FTP password for Polycom sets). This can be changed, but will then require manual configuration from each set in order to advise them of their nonstandard credentials.[63]
For added security, let’s make sure the FTP server keeps that account in a chroot jail:
# echo PlcmSpIp >> /etc/vsftpd/vsftpd.chroot_list
That pretty much does it as far as preparing the operating system to provide the required services to the phones.
In the next few sections we have provided instructions for
various popular SIP telephones. Choose the section that applies best
to the phone that you are planning to use (whether a hard- or
soft-phone). You will note that we have given all of these phones the
exact same unique identifier. If you plan on installing more than one
of them, you will need to ensure that they have unique names, and be
sure to update your sip.conf file
to include those device definitions.
CounterPath’s X-Lite softphone has become very popular with the Asterisk community. It is simple, functional, easy on the eyes, and—most importantly—free.
In this section we will be configuring the X-Lite softphone to connect to Asterisk. The IP address of the phone is 192.168.1.250, and Asterisk is located at 192.168.1.100. The X-Lite is available for Microsoft Windows, Mac, and Linux. You can obtain a copy of X-Lite from http://www.counterpath.com/index.php?menu=download.
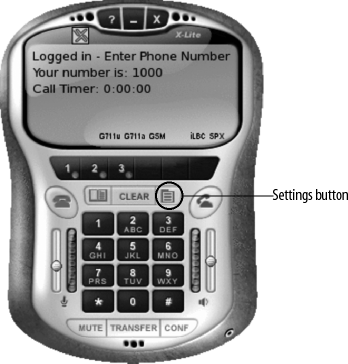
Now let’s configure our softphone for connecting to our Asterisk box. To configure X-Lite, click on the Settings button, as circled in Figure 4.2, “X-Lite configuration”.
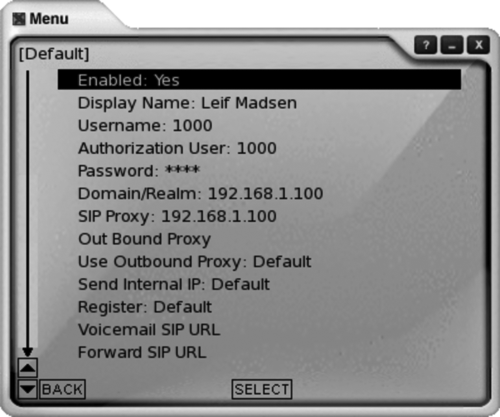
Select System Settings → SIP Proxy → [Default], which will display the default configuration for the softphone. Configure the screen as shown in Figure 4.3, “X-Lite user configuration”.
If you have not already started Asterisk, then start it now (see Chapter 3, Installing Asterisk for help installing and starting Asterisk). If Asterisk is running in the background, you can reconnect to the CLI by running the following command:
# asterisk -rvvv
You will then be given the Asterisk CLI like so:
*CLI>
If Asterisk was already
running before changing the sip.conf as instructed in this chapter, then
reload the dialplan and SIP channel with the following two
commands:
*CLI>dialplan reload*CLI>sip reload
In your X-Lite softphone client, close the Settings windows by clicking the BACK button until the windows are all closed. You should see X-Lite try to register to Asterisk, and if successful, you will see the following at the Asterisk CLI:
-- Registered SIP '1000' at 192.168.1.250 port 5061 expires 3600
You can verify the registration status at any time like so:
*CLI> sip show peers

Name/username              Host            Dyn Nat ACL Port     Status
1000/1000                  192.168.1.250    D   N      5061    OK (63 ms)
1 sip peers [1 online , 0 offline]
More detailed stats of the peer can be shown as follows with
sip show peer 1000:
*CLI> sip show peer 1000


  * Name       : 1000
  Secret       : <Not set>
  MD5Secret    : <Not set>
  Context      : phones
  Subscr.Cont. : <Not set>
  Language     :
  AMA flags    : Unknown
  Transfer mode: open
  CallingPres  : Presentation Allowed, Not Screened
  Callgroup    :
  Pickupgroup  :
  Mailbox      :
  VM Extension : asterisk
  LastMsgsSent : 32767/65535
  Call limit   : 0
  Dynamic      : Yes
  Callerid     : "" <>
  MaxCallBR    : 384 kbps
  Expire       : 1032
  Insecure     : no
  Nat          : RFC3581
  ACL          : No
  T38 pt UDPTL : No
  CanReinvite  : Yes
  PromiscRedir : No
  User=Phone   : No
  Video Support: No
  Trust RPID   : No
  Send RPID    : No
  Subscriptions: Yes
  Overlap dial : Yes
  DTMFmode     : rfc2833
  LastMsg      : 0
  ToHost       :
  Addr->IP     : 192.168.1.250 Port 5061
  Defaddr->IP  : 0.0.0.0 Port 5060
  Def. Username: 1000
  SIP Options  : (none)
  Codecs       : 0x8000e (gsm|ulaw|alaw|h263)
  Codec Order  : (none)
  Auto-Framing:  No
  Status       : Unmonitored
  Useragent    : X-Lite release 1105d
  Reg. Contact : sip:1000@192.168.1.250:5061
A lot of folks say configuring Polycom phones is difficult. From what we can tell, they base this on one of two reasons: 1) The Polycom web-based interface is horrible, or 2) the automatic provisioning process is painful and confusing.
With respect to item 1, we agree. The web interface on the Polycom phones has got to be one of the most annoying web interfaces ever developed for an IP telephone. We don’t use it, and we don’t recommend it.[64]
So that leaves us with some sort of server-based configuration. Fortunately, in this regard, the Polycom IP phones are superb—so much so that we can pretty much forgive the web interface. Set configurations are stored in files on a server, and each set navigates to the server, downloads the configuration files that are relevant to it, and applies them to itself.
If you cannot control your DHCP server, you may have to manually specify the FTP server information on the phone. This is done by rebooting the set, pressing the setup button before the set begins the load process, and specifying the address of the FTP server in the small boot menu that these phones offer.
The Polycom phones are able to download their configuration by one of three protocols: TFTP, HTTP, and FTP.
Right off the bat we are going to tell you to avoid TFTP. It is not secure, and the set cannot use date information to determine which versions of various files are the most current. It works, but there are better ways, and we are not going to discuss it further.
Polycom phones can pull their config data using HTTP as well, but it has not proven to be popular, and so we are going to move on.
FTP is currently the preferred method of allowing Polycom phones to obtain their configuration. It works well, is fairly easy to configure, and is well supported by the community.
FTP is currently our favorite way to configure Polycom sets. To install it on your CentOS system, the following command will install VSFTPD, the Very Secure FTP Daemon:
# yum -y install vsftpdThen,
in order to lock things down, we need to prevent anonymous logins,
with a simple change to thevsftpd config file, /etc/vsftpd/vsftpd.conf:
# anonymous_enable=NO
Restart the server with service vsftpd
restart. To ensure that the daemon runs after every reboot,
run chkconfig vsftpd on.
Now, we have to create a user account and group for the Polycom sets to use:
# groupadd PlcmSpIp
# useradd PlcmSpIp -g PlcmSpIp -p PlcmSpIp
# passwd PlcmSpIp
Set the password to PlcmSpIp (the default FTP password for Polycom sets). This can be changed, but will then require manual configuration from each set in order to advise them of their nonstandard credentials.[65]
For added security, let’s make sure the FTP server keeps that account in a chroot jail:
# echo PlcmSpIp >> /etc/vsftpd/vsftpd.chroot_list
That pretty much does it as far as preparing the operating system to provide the required services to the phones.
While there seem to be a lot of different files that are needed to make a Polycom set work, they are each fairly easy to understand.
This can best be described as the BIOS and operating system of the phone.
Perhaps there is a more technical explanation, but why make things
confusing? The bootROM should not need to be updated regularly, but
it is good to keep an eye on the current releases to see if a newer
bootROM has features that will be of benefit in your environment.
This file will be named bootrom.ld.
Since Polycom sets are capable of supporting other VoIP protocols (MGCP is supported, for example), the protocol that this set will employ forms part of the application image that the phone will download and run. If the image on the set is already correct, this file is not actually needed on the FTP server; however, it is common to have this file available to ensure that the most recent version of the protocol is available for the sets to download. You will sometimes receive phones that are not running the latest version, so having the most current image will ensure that all sets are up-to-date.
There is normally only one version of this file on a system, but it can be named
anything you want, and there can be as many different versions of
this file as are needed. For example, if you had an office where
there were two different languages in use, some users might prefer
French on their set, and others English. In that case, you’d create
a french.sip.conf file and an
english.sip.conf file to handle
each case. Name this file as you see fit, but pick a name that makes
sense so that future administrators have a chance to make sense of
your design choices.
This file is very simple and small. It is named to match the MAC address of each phone (so each set will need its own copy of this file) and tells the set what other files it needs to download in order to configure itself. This is the first config file each set will read. In this file will be a reference to the application image this set will use (currently named sip.ld), as well as the names of the XML files that have the parameters for this phone (the .cfg files). A master config file for a set might look something like this:
'<?xml version="1.0" standalone="yes"?>'
'<!-- Default Master SIP Configuration File-->'
'<!-- Edit and rename this file to <Ethernet-address>.cfg for each phone.-->'
'<!-- $Revision: 1.14 $  $Date: 2005/07/27 18:43:30 $ -->'
'<APPLICATION APP_FILE_PATH="sip.ld"
  CONFIG_FILES="phone1.cfg, sip.cfg"
  MISC_FILES=""
  LOG_FILE_DIRECTORY=""
  OVERRIDES_DIRECTORY=""
  CONTACTS_DIRECTORY=""
/>'
Note the name of the application file that we want this set to use, and the config files that it will be trying to find and apply.
We recommend giving the phone1.cfg files names that make sense. For example, SET<xxx>.cfg (such as SET201.cfg) to match the extension number
of the phone, or FLOOR4CUBE23.cfg, or maybe BOB_SMITHS_IP430_SET.cfg, or whatever
seems best to you. What’s the best way to name them? We’re going to
answer that question by asking a question. Let’s say you have 100 of
these phones. When you list the contents of the /home/PlcmSpIp folder, how do you want
the 100 config files for the sets to appear?
Settings that are configured directly on the telephone will be stored on the filesystem of the set, and may take precedence over parameters passed in config files. If you are having any problems applying changes to a set, try reformatting the phone. This will force the set to accept the parameters contained in the config files.
The venerable old C7960 is now a part of VoIP history. One of the first SIP telephones that could actually be taken seriously, the only real complaint one can have about this phone is the price: they are the Cadillac of SIP phones (meaning that they have all the bells and whistles but are tough to justify at the price, and are a little out of date sometimes).
If you can get one of these, you are getting an excellent SIP telephone. If you buy one new, be prepared to pay.
One of the ways this phone is out of date is the lack of remote provisioning from anything other than TFTP. TFTP has lost favor with networking professionals due to the lack of authentication and encryption, but since it is the only method of remotely provisioning the phone, we are going to have to use the tftp-server daemon. We can install tftp-server with the following command:
# yum install -y tftp-serverOnce
installed, we need to enable the server by modifying the
/etc/xinetd.d/tftp file. To enable the TFTP server,
change the disable=yes line to
disable=no.
service tftp
{
    socket_type             = dgram
    protocol                = udp
    wait                    = yes
    user                    = root
    server                  = /usr/sbin/in.tftpd
    server_args             = -s /tftpboot
    disable                 = no
    per_source              = 11
    cps                     = 100 2
    flags                   = IPv4
}
Then start the TFTP server by running:
# service xinetd restartWe can verify the server is running with the following command:
# chkconfig --list | grep tftp
  tftp:   on
As long as tftp:
on was returned, the server is up and running.
Note
Cisco phones by default are loaded with their own communication protocol known as SCCP (or Skinny). We will be showing you how to configure the phone, but due to the proprietary nature of Cisco and its phones, you will need to obtain the SIP firmware from your distributor. Also, there are both chan_sccp and chan_skinny modules for Asterisk, but they are beyond the scope of this book.
We will be registering our Cisco phone to the SIP friend we
configured in the section called “Zaptel Hardware Configuration”.” The following
configuration file should be saved into a file taking the format of
SIP<mac>.cnf, where <mac> represents the MAC address of the
telephone device you are configuring. Place this file into the /tftpboot/ directory on your server:
# Line 1 Configuration
line1_name: "1000"
line1_authname: "1000"
line1_shortname: "Jimmy Carter"
line1_password: ""
line1_displayname: ""

# The phone label, displayed in the upper-righthand corner of the phone
phone_label: "aristotle" ; Has no effect on SIP messaging

# Phone password used for console or telnet access, limited to 31 characters
phone_password: "cisco"
Then configure the address to register
in the SIPDefault.cnffile, also placed in the /tftpboot/ directory of your server.
proxy1_address will contain the IP address of your
Asterisk server of where the phone should register for line 1. The
image_version contains the version of the
.loads and .sb2 files the
phone will load into memory.
image_version: P0S3-08-4-00
proxy1_address: 192.168.1.100
We need one additional file called OS79XX.TXT. This file contains only a single line―the .bin and .sbn file version to load into memory:
P003-08-4-00
In
order for our Cisco 7960 to use these files, we need to tell the phone
where to pull its configuration from. If using the DHCP server from your
Linux server, you can modify the /etc/dhcpd.conf file in order to tell the
phone where to pull its configuration from by adding the line:
option tftp-server-name "192.168.1.100";
which contains the IP address of the server hosting the TFTP server (assuming of course the TFTP server is configured at that address. This is the address we’ve been using for our Asterisk server, and we again assume you’ve installed the TFTP server on the same box as Asterisk). See the section called “DHCP server”” for more information about configuring the DHCP server:
ddns-update-style interim;
ignore client-updates;

subnet 192.168.1.0 netmask 255.255.255.0 {
     option routers 192.168.1.1;
     option subnet-mask 255.255.255.0;
     option domain-name-servers 192.168.1.1;
     option tftp-server-name "192.168.1.100";
     option ntp-servers pool.ntp.org;
     option time-offset -18000;

    range dynamic-bootp 192.168.1.128 192.168.1.254;
    default-lease-time 21600;
    max-lease-time 43200;
}
Tip
Alternatively, you can configure from the phone itself to manually use an alternative TFTP server than that given by the DHCP server. To do so, press the settings button, (on the G version of the Cisco phones, this looks like a square with a check mark inside of it; G means Global). You will then need to unlock the settings by pressing the 9 key. The default password is cisco. Once the phone is unlocked, press the 3 key on the dialpad to enter the Network Configuration. Scroll down to option 32 and set the Alternate TFTP to YES. Then scroll up to option 7 and enter the IP address of the TFTP server you wish to boot from. Accept the settings and back out of the menu until the phone reboots itself. You can also use the *-6-settings three finger salute to reboot your phone at any time.
You can watch the phone pull its configuration from the TFTP
server by using tshark (yum install ethereal). Filter on port 69 using
the following command:
# tshark port 69You should then be able to watch the network traffic from the phone requesting data from your TFTP server.
If all goes well, then you should see your phone registered to Asterisk!
Ever since they purchased Sipura Technologies, Linksys has been producing a line of economical VoIP telephones and ATAs (Analog Terminal Adaptors). Linksys has been stealing a lot of business from Cisco. If you have read Clayton M. Christensen’s The Innovator’s Dilemma (HarperCollins), it becomes easier to understand Cisco’s strategy with respect to Linksys.
Linksys (and Sipura) products are well regarded for their excellent quality, especially relative to their price, but they are also famous for being painfully difficult to configure. This is mostly because their configuration GUI offers hundreds of configurable parameters.
We don’t care about that. Here’s what you need to know to get an SPA-942 working with your Asterisk system (and, we hope, most other Linksys VoIP devices as well).
The first thing you need to do is get the IP address of the phone so you can log in to the GUI interface. From the phone itself, select the icon that looks like a piece of paper with a dog-eared corner (right below the envelope icon). This is the Settings button, and is shown in Figure 4.4, “SPA-942 keypad”.
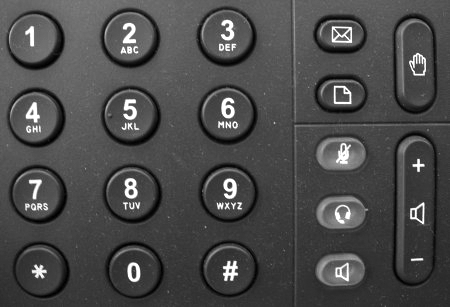
To get the IP address of the phone, press the Settings button, followed by 9 (or use directional pad and scroll down to Network). Then press the select button (there is a row of 4 buttons under the LCD screen—select is the leftmost button). The second field should show you the IP address of the phone.
Now open your browser, enter the IP address into the address bar, hit Enter, and you will be at the Info screen of the phone.
Select the Admin Login link in the upper-right corner of the screen. Once you’ve done this, you will be given several new tabs, such as Regional, Phone, Ext 1, Ext 2, and User.
Select the Ext 1 tab which will set up our first line. Then make the following menu selections:
General → Line Enable → yes
NAT Settings → NAT Mapping Enable → no
NAT Settings → NAT Keep Alive Enable → no
Proxy and Registration → Proxy → enter the IP address of Asterisk (e.g., 192.168.1.100)
Proxy and Registration → Register → yes
Proxy and Registration → Make Call Without Reg → no
Proxy and Registration → Ans Call Without Reg → no
Subscriber Information → Display Name → Caller ID information
Subscriber Information → User ID → 1000
Subscriber Information → Password → (leave blank if you’re using the simple configuration from earlier in this chapter)
Subscriber Information → Use Auth ID → yes
Subscriber Information → Auth ID → 1000
Audio Configuration → Preferred Codec → G711u
Audio Configuration → Use Pref Codec Only → no
Audio Configuration → Silence Supp Enable → no
Audio Configuration → DTMF Tx Method → Auto
Submit All Changes
And that’s it! Your phone should be registered to Asterisk now. You’ll know this because the first lighted line button beside the LCD screen will change from orange to green.
In order to allow our phone to call other phones (or, if a multiline phone, to call
itself), we need to modify the extensions.conf
file. Building on what we had in the section called “Setting Up the Dialplan for Some Test Calls”,” add the following parts to the
[internal] context:
exten => 1000,1,Verbose(1|Extension 1000)
exten => 1000,n,Dial(SIP/1000,30)
exten => 1000,n,Hangup()
If you have two phones, or multiple lines configured, you can duplicate the previous configuration and change the 1000 to the other extension name.
[57] RFC 3261 is available at http://www.ietf.org/rfc/rfc3261.txt.
While the document is fairly large, we strongly encourage anyone who
wishes to become an Asterisk professional to read at least the first
100 or so pages of this document and to understand how calls are set
up, as this knowledge will be imperative when you’re looking at a SIP
trace (sip debug from the Asterisk console) trying
to determine why your calls are not getting set up correctly.
[58] An excellent open source SIP proxy is OpenSER, available at http://www.openser.org.
[59] Yes, there are ways to making the media flow directly between
the phones once the call is set up. This is done in the
sip.conf file using either
directrtpsetup=yes (an experimental option allowing
the media to be redirected in the initial call setup) or
canreinvite=yes (where media initially goes through
Asterisk until a re-INVITE happens, at which point the media can be
sent directly between the phones).
[60] The maximum length of a username is 255 characters.
[61] Typically, it’s at 4 A.M. on the morning of a critical 8 A.M. meeting, after having worked all weekend. Red Bull is probably the most popular drink of the Asterisk developers. Dr. Pepper would be a close second. Red Bull, anyone?
[62] FTP is preferred over TFTP due to the ability of a Polycom phone to see timestamps on FTP files. This allows the phone to avoid redownloading configuration files and firmware updates that it already has—thus shortening boot time.
[63] You can get into assigning complex and unguessable passwords for the phones to use, but unless you are going to input the passwords into each phone manually, you’ll have to pass them their FTP username and password from the DHCP server. Any device that can get on the voice network can get the same information from the DHCP server. We’re not telling you to ignore security; just don’t assume that creating separate passwords for each phone is going to improve security.
[64] Actually, it does serve one useful purpose, which is to allow you to log on to a set via a browser and query its configuration.
[65] You can get into assigning complex and unguessable passwords for the phones to use, but unless you are going to input the passwords into each phone manually, you’ll have to pass them their FTP user name and password from the DHCP server. Any device that can get on the voice network can get the same information from the DHCP server. We’re not telling you to ignore security, just don’t assume that creating separate passwords for each phone is going to improve security.