Before we get to DAHDI and Asterisk configuration, we need to physically connect to the PSTN. Unfortunately, there are no worldwide standards for these connections; in fact, there are often variations from one part of a given country to another.
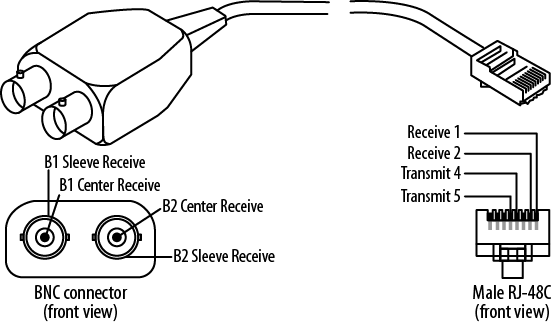
PRI connections are generally terminated in an RJ45 connection these days, although the impedance of the connections can vary. In some countries (notably in South America), it is still possible to find PRIs terminated in two BNC connectors, one for transmit and one for receive.
Generally speaking, a PRI terminated in an RJ45 will be an ISDN connection, and if you find the connection is made by a pair of BNC connectors (push-and-twist coaxial connectors), the likelihood is that you are dealing with a CAS-based protocol (like R2).
Figure 9.3, “A balun” shows the adaptor required if your telco has supplied BNC connectors (the Digium cards require an RJ45 connection). It is called a balun, as it converts from a balanced connection (RJ45) to an unbalanced connection (the BNCs), in addition to changing the connection impedance.
Note
Basic Rate Interfaces (BRIs) are common in continental Europe and are almost always supplied via an RJ45 connection.
Analog connections vary massively from place to place—you will know what kind of connector is used in your locality. The important thing to remember is that the analog line is only two wires, and these need to connect to the middle two pins of the RJ11 plug that goes into the Digium card—the other end is the local one. Figure 9.4, “The BT plug used for analog PSTN connections in the UK (note only pins 2–5 are present)” shows the plug used in the UK, where the two wires are connected to pins 2 and 5.

The Digium Asterisk Hardware
Device Interface, or DAHDI, actually covers a number of things. It
contains the kernel drivers for telephony adaptor cards that work within
the DAHDI framework, as well as automatic configuration utilities and test
tools. These parts are contained in two separate packages
(dahdi-linux and dahdi-tools),
but we can also use one complete package, called
dahdi-linux-complete. All three packages are
available at http://downloads.digium.com/pub/telephony/. The
installation of DAHDI was covered in Chapter 3, Installing Asterisk.
Chapter 7, Outside Connectivity covered the use of analog and digital PSTN connections, and we will not reiterate those details here. If you are using digital PSTN connections, your job is to find out what sort of connection the telco is giving you. Generally, if you have requested a primary rate interface (PRI), this will be a T1 in North America, a J1 in Japan, or an E1 in pretty much the rest of the world.
Once you have established the type of PRI connection the telco has given you, there are some further details that you will require in order to properly configure DAHDI and Asterisk (e.g., whether the connection is ISDN or a CAS-based protocol). Again, you will find these in Chapter 7, Outside Connectivity.
The connections where some real localization will need to
take place are those of analog interfaces. For the purposes of
configuring your Asterisk-based telephone system to work best in a given
locality, you will first need to specifically configure some low-level
aspects of the way the Digium card interacts with the connected device
or line. This is done through the DAHDI kernel driver(s), in a file
called /etc/dahdi/system.conf.
In the following lines (taken
from the sample configuration that you get with a fresh install of
DAHDI), you will find both the loadzone and
defaultzone settings. The
loadzone setting allows you to choose which tone set(s) the card
will both generate (to feed to analog telephones) and recognize (on the
connected analog telephone lines):
# Tone Zone Data
# ^^^^^^^^^^^^^^
# Finally, you can preload some tone zones, to prevent them from getting
# overwritten by other users (if you allow non-root users to open /dev/dahdi/*
# interfaces anyway). Also this means they won't have to be loaded at runtime.
# The format is "loadzone=<zone>" where the zone is a two letter country code.
#
# You may also specify a default zone with "defaultzone=<zone>" where zone
# is a two letter country code.
#
# An up-to-date list of the zones can be found in the file zonedata.c
#
loadzone = us
#loadzone = us-old
#loadzone=gr
#loadzone=it
#loadzone=fr
#loadzone=de
#loadzone=uk
#loadzone=fi
#loadzone=jp
#loadzone=sp
#loadzone=no
#loadzone=hu
#loadzone=lt
#loadzone=pl
defaultzone=us
#
Tip
The
/etc/dahdi/system.conf file uses the hash
symbol (#) to indicate a comment instead of a semicolon
(;) like the files in
/etc/asterisk/.
Although it is possible to load a number of different tone sets
(you can see all the sets of tones in detail in
zonedata.c) and to switch between them, in most
practical situations you will only need:
loadzone=uk     # to load the tone set
defaultzone=uk  # to default DAHDI to using that set
…or whichever tones you need for your region.
If you perform a
dahdi_genconf to automatically (or should that be auto-magically?)
configure your DAHDI adaptors, you will notice that the newly generated
/etc/dahdi/system.conf will have defaulted both
loadzone and defaultzone to being
us. Despite the warnings not to hand-edit the file,
it is fine to change these settings to what you need.
In case you were wondering how
we tell whether there are any voicemails in the mailbox associated with
the channel an analog phone is plugged into, it is done with a stuttered
dialtone. The format of this stuttered dialtone is decided by the
loadzone/defaultzone combination
you have used.
As a quick aside, analog phones that have a message waiting indicator (e.g., an LED or lamp that flashes to indicate there is new voicemail) achieve this by automatically going off-hook periodically and listening for the stuttered dialtone. You can witness this by watching the Asterisk command line to see the DAHDI channel go active (if you have nothing better to do!).
That’s it at the DAHDI level. We chose the protocol(s) for PRI or BRI connections, the type of signaling for the analog channels (all covered in Chapter 7, Outside Connectivity), and the tones for the analog connections that have just been discussed.
Tip
Once you have completed your
configuration at the DAHDI level (in
/etc/dahdi/system.conf), you need to perform a
dahdi_cfg -vvv to have DAHDI reread the configuration. This is also a
good time to use dahdi_tool to check that everything appears to be in order at the
Linux level.
This way, if things do not
work properly after you have configured Asterisk to work with the DAHDI
adaptors, you can be sure that the problem is confined to
chan_dahdi.conf (or an #included
dahdi-channels.conf if you are using this part of the
dahdi_genconf output).
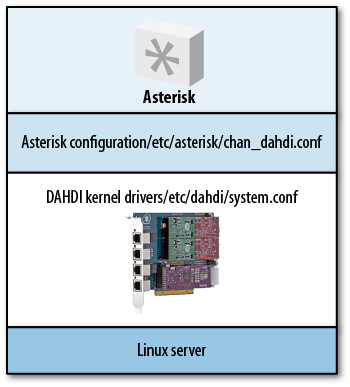
The relationship between Linux,
DAHDI, and Asterisk (and therefore
/etc/dahdi/system.conf and
/etc/asterisk/chan_dahdi.conf) is shown in Figure 9.5, “The relationship between Linux, DAHDI, and Asterisk”.