The func_odbc dialplan
function is arguably the coolest and most powerful dialplan function in
Asterisk. It allows you to create and use fairly simple dialplan functions
that retrieve and use information from databases directly in the dialplan.
There are all kinds of ways in which this might be used, such as for
managing users or allowing the sharing of dynamic information within a
clustered set of Asterisk machines.
What func_odbc allows you to do is define SQL queries
to which you assign function names. In effect, you are creating custom
functions that obtain their results by executing queries against a
database. The func_odbc.conf file is
where you specify the relationships between the function names you create
and the SQL statements you wish them to perform. By referring to the named
functions in the dialplan, you can retrieve and update values in the
database.
Tip
While using an external script to interact with a database (from which a flat file is created that Asterisk will read) has advantages (if the database goes down, your system will continue to function and the script will simply not update any files until connectivity to the database is restored), it also has disadvantages. A major disadvantage is that any changes you make to a user will not be available until you run the update script. This is probably not a big issue on small systems, but on large systems waiting for changes to take effect can cause issues, such as pausing a live call while a large file is loaded and parsed.
You can relieve some of this by utilizing a replicated database system. Asterisk 1.6.0 and newer provide the ability to fail over to another database system. This way, you can cluster the database backend utilizing a master-master relationship (for PostgreSQL, pgcluster or Postgres-R;[145] for MySQL it’s native[146]), or a master-slave (for PostgreSQL, Slony-I, for MySQL it’s native) replication system.
In order to get you into the right frame of mind for what follows, we want you to picture a Dagwood sandwich.[147]
Can you relay the total experience of such a
thing by showing someone a picture of a tomato, or by waving a slice of
cheese about? Not hardly. That is the conundrum we faced when trying to
give a useful example of why func_odbc
is so powerful. So, we decided to build the whole sandwich for you. It’s
quite a mouthful, but after a few bites of this, peanut butter and jelly
is never going to be the same.
For our example, we decided to implement something we think could have some practical uses. Picture a small company with a sales force of five people who have to share two desks. This is not as cruel as it seems, because these folks spend most of their time on the road, and they are each only in the office for at most one day each week.
Still, when they do get into the office, they’d like the system to know which desks they are sitting at, so that their calls can be directed there. Also, the boss wants to be able to track when they are in the office and control calling privileges from those phones when no one is there.
This need is typically solved by what is
called a hot-desking feature, so we have built one
for you in order to show you the power of func_odbc.
Lets start with the easy stuff, and create
two desktop phones in the sip.conf file:
; sip.conf
; HOT DESK USERS
[0000FFFF0001]
type=friend
host=dynamic
secret=my_special_secret
context=hotdesk
qualify=yes

[0000FFFF0002]
type=friend
host=dynamic
secret=my_special_secret
context=hotdesk
qualify=yes

; END HOT DESK USERS
These two desk phones both enter the
dialplan at the hotdesk context in
extensions.conf. If you want to have these devices actually work, you will
of course need to set the appropriate parameters in the devices
themselves, but we covered all that in Chapter 5, User Device Configuration.
That’s all for sip.conf. We’ve got two slices of bread, which
is hardly a sandwich yet.
Now let’s get the database part of it set up (we are assuming that you have an ODBC database created and working, as outlined in the earlier parts of this chapter). First, connect to the database console.
$sudo su - postgres$psql -U asterisk -h localhost asteriskPassword:
Then create the table with the following bit of SQL:
CREATE TABLE ast_hotdesk
(
  id serial NOT NULL,
  extension int8,
  first_name text,
  last_name text,
  cid_name text,
  cid_number varchar(10),
  pin int4,
  context text,
  status bool DEFAULT false,
  "location" text,
  CONSTRAINT ast_hotdesk_id_pk PRIMARY KEY (id)
)
WITHOUT OIDS;
$mysql -u asterisk -p asteriskEnter password:
Then create the table with the following bit of SQL:
CREATE TABLE ast_hotdesk
(
  id serial NOT NULL,
  extension int8,
  first_name text,
  last_name text,
  cid_name text,
  cid_number varchar(10),
  pin int4,
  context text,
  status bool DEFAULT false,
  location text,
  CONSTRAINT ast_hotdesk_id_pk PRIMARY KEY (id)
);
The table information is summarized in Table 16.1, “Summary of ast_hotdesk table”.
Table 16.1. Summary of ast_hotdesk table
| Column name | Column type |
|---|---|
id | Serial, auto-incrementing |
extension | Integer |
first_name | Text |
last_name | Text |
cid_name | Text |
cid_number | Varchar 10 |
pin | Integer |
context | Text |
status | Boolean, default false |
location | Text |
After that, populate the database with the following information (some of the values that you see actually will change only after the dialplan work is done, but we include it here by way of example).
At the PostgreSQL console, run the following commands:
asterisk=>INSERT INTO ast_hotdesk ('extension', 'first_name', 'last_name',\ 'cid_name','cid_number', 'pin', 'context', 'location') \ VALUES (1101, 'Leif', 'Madsen', 'Leif Madsen', '4165551101', '555',\ 'longdistance','0000FFFF0001');
At the MySQL console, run the following commands:
mysql>INSERT INTO ast_hotdesk (extension, first_name, last_name, cid_name, cid_number, pin, context, location) VALUES (1101, 'Leif', 'Madsen', 'Leif Madsen', '4165551101', '555', 'longdistance', '0000FFFF0001');
Repeat
these commands, changing the VALUES as
needed, for all entries you wish to have in the database. You can view the
data in the ast_hotdesk table by
running a simple SELECT statement from
the database console:
mysql>SELECT * FROM ast_hotdesk;
which would give you something like the following output:
| id | extension | first_name | last_name      | cid_name           | cid_number
|----+-----------+------------+----------------+--------------------+--------------
|  1 | 1101      | "Leif"     | "Madsen"       | "Leif Madsen"      | "4165551101"
|  2 | 1102      | "Jim"      | "Van Meggelen" | "Jim Van Meggelen" | "4165551102"
|  3 | 1103      | "Russell"  | "Bryant"       | "Russell Bryant"   | "4165551103"
|  4 | 1104      | "Mark"     | "Spencer"      | "Mark Spencer"     | "4165551104"
|  5 | 1105      | "Kevin"    | "Fleming"      | "Kevin Fleming"    | "4165551105"

|  pin  | context         | status  | location       |$
+-------+-----------------+---------+----------------+
| "555" | "longdistance"  | "TRUE"  | "0000FFFF0001" |
| "556" | "longdistance"  | "FALSE" | ""             |
| "557" | "local"         | "FALSE" | ""             |
| "558" | "international" | "FALSE" | ""             |
| "559" | "local"         | "FALSE" | ""             |
We’ve got the condiments now, so let’s get to our dialplan. This is where the magic is going to happen.
Somewhere in extensions.conf we are going to have to create
the hotdesk context. To start, let’s
define a pattern-match extension that will allow the users to log
in:
; extensions.conf
; Hot-Desking Feature
[hotdesk]
; Hot Desk Login
exten => _#110[1-5],1,NoOp()
   same => n,Set(E=${EXTEN:1})  ; strip off the leading hash (#) symbol
   same => n,Verbose(1,Hot Desk Extension ${E} is changing status)
   same => n,Verbose(1,Checking current status of extension ${E})
   same => n,Set(${E}_STATUS=${HOTDESK_INFO(status,${E})})
   same => n,Set(${E}_PIN=${HOTDESK_INFO(pin,${E})})
We’re not done writing this extension yet, but let’s pause for a moment and see where we’re at so far.
When a sales agent sits down at a desk, he
logs in by dialing hash (#) plus his own extension number. In this case we
have allowed the 1101 through 1105 extensions to log in with our pattern
match of _#110[1-5]. You could just as
easily make this less restrictive by using _#11XX (allowing 1100 through 1199). This
extension uses func_odbc to perform a
lookup with the HOTDESK_INFO() dialplan
function. This custom function (which we will define in the func_odbc.conf file) performs an SQL statement
and returns whatever is retrieved from the database.
We would define the new function HOTDESK_INFO() in func_odbc.conf like so:
[INFO]
prefix=HOTDESK
dsn=asterisk
readsql=SELECT ${ARG1} FROM ast_hotdesk WHERE extension = '${ARG2}'
That’s a lot of stuff in just a few lines. Let’s quickly cover them before we move on.
First of all, the prefix is optional. If you don’t configure the
prefix, then Asterisk adds “ODBC” to the name of the function (in this case,
INFO), which means this function would
become ODBC_INFO(). This is not very
descriptive of what the function is doing, so it can be helpful to assign
a prefix that helps to relate your ODBC functions to the tasks they are
performing. We chose HOTDESK, which
means that this custom function will be named HOTDESK_INFO().
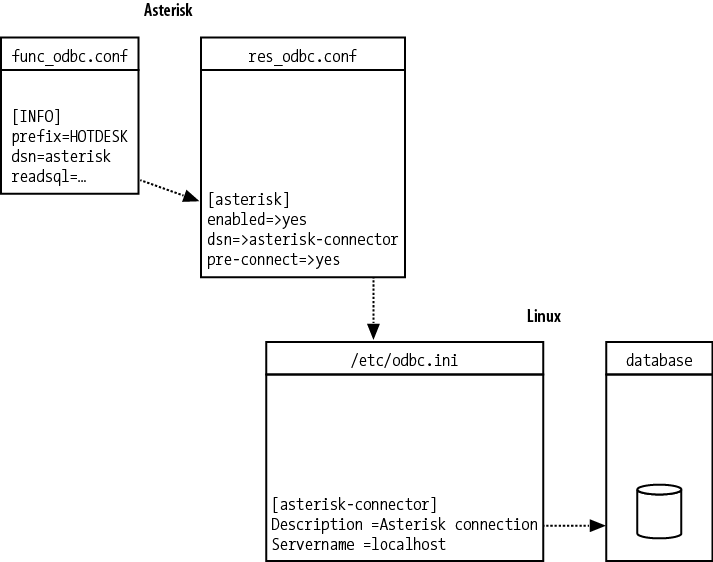
The dsn
attribute tells Asterisk which connection to use from res_odbc.conf. Since several database
connections could be configured in res_odbc.conf, we specify which one to use
here. In Figure 16.1, “Relationships between func_odbc.conf, res_odbc.conf,
/etc/odbc.ini (unixODBC), and the database connection”, we show the relationship
between the various file configurations and how they reference down the
chain to connect to the database.
Tip
The func_odbc.conf.sample file in the Asterisk source contains additional
information about how to handle multiple databases and control the
reading and writing of information to different DSN connections.
Specifically, the readhandle,
writehandle, readsql, and writesql arguments will provide you with
great flexibility for database integration and control.
Finally, we define our SQL statement with the readsql attribute. Dialplan functions have two
different formats that they can be called with: one for retrieving
information, and one for setting information. The readsql attribute is used when we call the
HOTDESK_INFO() function with the
retrieve format (we could execute a separate SQL statement with the
writesql attribute; we’ll discuss the
format for that attribute a little bit later in this chapter).
Reading values from this function would take this format in the dialplan:
exten => s,n,Set(RETURNED_VALUE=${HOTDESK_INFO(status,1101)})This
would return the value located in the database within the status column where the extension column equals 1101. The status and 1101 we pass to the HOTDESK_INFO() function are then placed
into the SQL statement we assigned to the readsql attribute, available as ${ARG1} and ${ARG2}, respectively. If we had passed a third
option, this would have been available as ${ARG3}.
Figure 16.1. Relationships between func_odbc.conf, res_odbc.conf, /etc/odbc.ini (unixODBC), and the database connection
After the SQL statement is executed, the
value returned (if any) is assigned to the RETURNED_VALUE channel variable.
So, in the first two lines of the following
block of code, we are passing the value status and the value contained in the
${E} variable (e.g., 1101) to the HOTDESK_INFO() function. The two values are then
replaced in the SQL statement with ${ARG1} and ${ARG2}, respectively, and the SQL statement is
executed. Finally the value returned is assigned to the ${E}_STATUS channel variable.
OK, let’s finish writing the pattern-match extension now:
   same => n,Set(${E}_STATUS=${HOTDESK_INFO(status,${E})})
   same => n,Set(${E}_PIN=${HOTDESK_INFO(pin,${E})})
   same => n,GotoIf($[${ODBCROWS} < 0]?invalid_user,1)
; check if ${E}_STATUS is NULL
   same => n,GotoIf($[${${E}_STATUS} = 1]?logout,1:login,1)
After
assigning the value of the status
column to the ${E}_STATUS variable (if
the user dials extension 1101, the
variable name will be 1101_STATUS), we
check if we’ve received a value back from the database (error checking)
using the ${ODBCROWS} channel
variable.
The last row in the block checks the status
of the phone and, if the agent is currently logged in, logs him off. If
the agent is not already logged in, it will go to extension login, priority 1 within the same context.
Tip
Remember that in a traditional phone system all extensions must be numbers, but in Asterisk, extensions can have names as well. A possible advantage of using an extension that’s not a number is that it will be much harder for a user to dial it from her phone and, thus, more secure. We’re going to use several named extensions in this example. If you want to be absolutely sure that a malicious user cannot access those named extensions, simply use the trick that the AEL loader uses: start with a priority other than 1. You can access the first line of the extension by assigning it a priority label and referencing it via the extension name/priority label combination.
The login
extension runs some initial checks to verify the pin code entered by the
agent. We allow him three tries to enter the correct pin, and if all tries
are invalid we send the call to the login_fail extension (which we will be writing
later):
exten => login,1,NoOp() ; set initial counter values
   same => n,Set(PIN_TRIES=1)     ; pin tries counter
   same => n,Set(MAX_PIN_TRIES=3) ; set max number of login attempts
   same => n,Playback(silence/1)  ; play back some silence so first prompt is
                                  ; not cut off
   same => n(get_pin),NoOp()
   same => n,Set(PIN_TRIES=$[${PIN_TRIES} + 1])   ; increase pin try counter
   same => n,Read(PIN_ENTERED,enter-password,${LEN(${${E}_PIN})})
   same => n,GotoIf($["${PIN_ENTERED}" = "${${E}_PIN}"]?valid_login,1)
   same => n,Playback(pin-invalid)
   same => n,GotoIf($[${PIN_TRIES} <= ${MAX_PIN_TRIES}]?get_pin:login_fail,1)
If the pin entered matches, we validate the
login with the valid_login extension.
First we utilize the CHANNEL variable
to figure out which phone device the agent is calling from. The CHANNEL variable is usually populated with
something like SIP/0000FFFF0001-ab4034c, so we make use of the
CUT() function to first pull off the
SIP/ portion of the string and assign
that to LOCATION. We then strip off the
-ab4034c part of the string, discard
it, and assign the remainder (0000FFFF0001) to the LOCATION variable:
exten => valid_login,1,NoOp()
; CUT off the channel technology and assign it to the LOCATION variable
   same => n,Set(LOCATION=${CUT(CHANNEL,/,2)})
; CUT off the unique identifier and save the remainder to the LOCATION variable
   same => n,Set(LOCATION=${CUT(LOCATION,-,1)})
We utilize yet another custom function
created in the func_odbc.conf file,
HOTDESK_CHECK_PHONE_LOGINS(), to check
if any other users were previously logged into this phone and forgot to
log out. If the number of logged-in users is greater than 0 (it should never be more than 1, but we check for higher values anyway and
reset those, too), it runs the logic in the logout_login extension:
; func_odbc.conf
[CHECK_PHONE_LOGINS]
prefix=HOTDESK
dsn=asterisk

; *** This line should have no line breaks
readsql=SELECT COUNT(status) FROM ast_hotdesk WHERE status = '1' AND
location = '${ARG1}'
If there are no other agents logged into
the device, we update the login status for this user with the HOTDESK_STATUS() function:
; Continuation of the valid_login extension below
   same => n,Set(USERS_LOGGED_IN=${HOTDESK_CHECK_PHONE_
LOGINS(${LOCATION})})
   same => n,GotoIf($[${USERS_LOGGED_IN} > 0]?logout_login,1)
   same => n(set_login_status),NoOp()

; Set the status for the phone to '1' and where the agent is logged into
   same => n,Set(HOTDESK_STATUS(${E})=1,${LOCATION})
   same => n,GotoIf($[${ODBCROWS} < 1]?error,1)
   same => n,Playback(agent-loginok)
   same => n,Hangup()
We create a write function in func_odbc.conf like so:
[STATUS]
prefix=HOTDESK
dsn=asterisk

; *** This line should have no line breaks
writesql=UPDATE ast_hotdesk SET status = '${VAL1}',
location = '${VAL2}' WHERE extension = '${ARG1}'
The syntax is very similar to the readsql syntax discussed earlier in the chapter,
but there are a few new things here, so let’s discuss them before moving
on.
The first thing you may have noticed is that
we now have both ${VALx} and ${ARGx} variables in our SQL statement. These contain
the values we pass to the function from the dialplan. In this case, we
have two VAL variables and a single
ARG variable that were set from the
dialplan via this statement:
Set(HOTDESK_STATUS(${E})=1,${LOCATION})Notice the syntax is slightly different from that of the read-style function. This signals to Asterisk that you want to perform a write (this is the same syntax as that used for other dialplan functions).
We are passing the value of the ${E} variable to the HOTDESK_STATUS() function, whose value is then
accessible in the SQL statement within func_odbc.conf with the ${ARG1} variable. We then pass two values:
1 and ${LOCATION}. These are available to the SQL
statement in the ${VAL1} and ${VAL2} variables, respectively.
As mentioned previously, if we had to log out
one or more agents before logging this one in, we would check this with
the logout_login extension. This
dialplan logic will utilize the ODBC_FETCH() function to pop information off the
information stack returned by the HOTDESK_LOGGED_IN_USER() function. More than
likely this will execute only one loop, but it’s a good example of how you
might update or parse multiple rows in the database.[148]
The first part of our dialplan returns an ID
number that we can use with the ODBC_FETCH() function to iterate through the
values returned. We’re going to assign this ID to the LOGGED_IN_ID channel variable:
same => n,Set(LOGGED_IN_ID=${HOTDESK_LOGGED_IN_USER(${LOCATION})})Here
is the logout_login extension, which
could potentially loop through multiple rows:
exten => logout_login,1,NoOp()
; set all logged-in users on this device to logged-out status
   same => n,Set(LOGGED_IN_ID=${HOTDESK_LOGGED_IN_USER(${LOCATION})})
   same => n(start_loop),NoOp()
   same => n,Set(WHO=${ODBC_FETCH(${LOGGED_IN_ID})})
   same => n,GotoIf($["${ODBC_FETCH_STATUS}" = "FAILURE"]?cleanup)
   same => n,Set(HOTDESK_STATUS(${WHO})=0)           ; log out phone
   same => n,Goto(start_loop)
   same => n(cleanup),ODBCFinish(${LOGGED_IN_ID})
   same => n,Goto(valid_login,set_login_status)      ; return to logging in
We assign the first value returned from the database (e.g.,
the extension 1101) to the WHO channel. Before doing anything, though, we
check to see if the ODBC_FETCH()
function was successful in returning data. If the ODBC_FETCH_STATUS channel variable contains
FAILURE, we have no data to work with,
so we move to the cleanup priority
label.
If we have data, we then pass the value of
${WHO} as an argument to the HOTDESK_STATUS() function, which contains a value
of 0. This is the first value passed to
HOTDESK_STATUS() and is shown as ${VAL1} in func_odbc.conf, where the function is
declared.
If you look at the HOTDESK_STATUS() function in func_odbc.conf you will see we could also pass
a second value, but we’re not doing that here since we want to remove any
values from that column in order to log out the user, which setting no
value does effectively.
After using HOTDESK_STATUS() to log out the user, we return
to the start_loop priority label to
loop through all values, which simply executes a NoOp(). After attempting to retrieve a value, we
again check ODBC_FETCH_STATUS for
FAILURE. If that value is found, we
move to the cleanup priority label,
where we execute the ODBCFinish()
dialplan application to perform cleanup. We then return to the valid_login extension at the set_login_status priority label.
The rest of the context should be fairly
straightforward (if some of this doesn’t make sense, we suggest you go
back and refresh your memory with Chapters 6 and 10). The one
trick you may be unfamiliar with could be the usage of the ${ODBCROWS} channel variable, which is set by
the HOTDESK_STATUS() function. This
tells us how many rows were affected in the SQL UPDATE, which we assume to be 1. If the value of ${ODBCROWS} is less than 1, we assume an error and handle it
appropriately:
exten => logout,1,NoOp()
   same => n,Set(HOTDESK_STATUS(${E})=0)
   same => n,GotoIf($[${ODBCROWS} < 1]?error,1)
   same => n,Playback(silence/1&agent-loggedoff)
   same => n,Hangup()

exten => login_fail,1,NoOp()
   same => n,Playback(silence/1&login-fail)
   same => n,Hangup()

exten => error,1,NoOp()
   same => n,Playback(silence/1&connection-failed)
   same => n,Hangup()

exten => invalid_user,1,NoOp()
   same => n,Verbose(1,Hot Desk extension ${E} does not exist)
   same => n,Playback(silence/2&invalid)
   same => n,Hangup()
We also include the hotdesk_outbound context, which will handle our
outgoing calls after we have logged the agent into the system:
include => hotdesk_outbound
The
hotdesk_outbound context utilizes many
of the same principles discussed previously, so we won’t approach it quite
so thoroughly; essentially, this context will catch all numbers dialed
from the desk phones. We first set our LOCATION variable using the CHANNEL variable, then determine which extension
(agent) is logged into the system and assign that value to the WHO variable. If this variable is NULL, we reject the outgoing call. If it is not
NULL, then we get the agent information
using the HOTDESK_INFO() function and
assign it to several CHANNEL variables,
including the context to handle the call with, where we perform a Goto() to the context we have been assigned
(which controls our outbound access).
We will make use of the HOTDESK_PHONE_STATUS() dialplan function, which
you can define in func_odbc.conf like
so:
[PHONE_STATUS]
prefix=HOTDESK
dsn=asterisk
readsql=SELECT extension FROM ast_hotdesk WHERE status = '1'
readsql+= AND location = '${ARG1}'
If we try to dial a number
that is not handled by our context (or one of the transitive
contexts—i.e., international contains long distance, which also contains
local), the built-in extension i is
executed, which plays back a message stating that the action cannot be
performed and hangs up the call:
[hotdesk_outbound]
exten => _X.,1,NoOp()
   same => n,Set(LOCATION=${CUT(CHANNEL,/,2)})
   same => n,Set(LOCATION=${CUT(LOCATION,-,1)})
   same => n,Set(WHO=${HOTDESK_PHONE_STATUS(${LOCATION})})
   same => n,GotoIf($[${ISNULL(${WHO})}]?no_outgoing,1)
   same => n,Set(${WHO}_CID_NAME=${HOTDESK_INFO(cid_name,${WHO})})
   same => n,Set(${WHO}_CID_NUMBER=${HOTDESK_INFO(cid_number,${WHO})})
   same => n,Set(${WHO}_CONTEXT=${HOTDESK_INFO(context,${WHO})})
   same => n,Goto(${${WHO}_CONTEXT},${EXTEN},1)

[international]
exten => _011.,1,NoOp()
   same => n,Set(E=${EXTEN})
   same => n,Goto(outgoing,call,1)

exten => i,1,NoOp()
   same => n,Playback(silence/2&sorry-cant-let-you-do-that2)
   same => n,Hangup()

include => longdistance

[longdistance]
exten => _1NXXNXXXXXX,1,NoOp()
   same => n,Set(E=${EXTEN})
   same => n,Goto(outgoing,call,1)

exten => _NXXNXXXXXX,1,Goto(1${EXTEN},1)

exten => i,1,NoOp()
   same => n,Playback(silence/2&sorry-cant-let-you-do-that2)
   same => n,Hangup()

include => local

[local]
exten => _416NXXXXXX,1,NoOp()
   same => n,Set(E=${EXTEN})
   same => n,Goto(outgoing,call,1)

exten => i,1,NoOp()
   same => n,Playback(silence/2&sorry-cant-let-you-do-that2)
   same => n,Hangup()
If the call is allowed to be
executed, it is sent to the [outgoing]
context for processing and the caller ID name and number are set with the
CALLERID() function. The call is then placed via the
SIP channel using the service_provider
we created in the sip.conf
file:
[outgoing]
exten => call,1,NoOp()
   same => n,Set(CALLERID(name)=${${WHO}_CID_NAME})
   same => n,Set(CALLERID(number)=${${WHO}_CID_NUMBER})
   same => n,Dial(SIP/service_provider/${E})
   same => n,Playback(silence/2&pls-try-call-later)
   same => n,Hangup()
Our service_provider might look something like this
in sip.conf:
[service_provider]
type=friend
host=switch1.service_provider.net
defaultuser=my_username
fromuser=my_username
secret=welcome
context=incoming
canreinvite=no
disallow=all
allow=ulaw
Now that we’ve implemented a fairly complex
feature in the dialplan with the help of func_odbc to retrieve and store data in a remote
relational database, hopefully you’re starting to get why we think this is
so cool. With a handful of self-defined dialplan functions in the
func_odbc.conf file and a couple of
tables in a database, we can create some fairly rich applications!
How many things have you just thought of that
you could apply func_odbc to?
[145] pgcluster appears to be a dead project, and Postgres-R appears to be in its infancy, so there may currently be no good solution for master-master replication using PostgreSQL.
[146] There are several tutorials on the Web describing how to set up replication with MySQL.
[147] And if you don’t know what a Dagwood is, that’s what Wikipedia is for. I am not that old.
[148] Also see Multirow Functionality with func_odbc for more information and examples of parsing multiple rows returned from the database.